
The basics
SKÅDIS is IKEA’s pegboard system. Instead of round holes it has tall, narrow slots in a staggered pattern, and accessories hang by hooking a tab through a slot and dropping a lip down behind the board. Because the slots are the same on every board, one printed accessory fits every SKÅDIS board, in any colour, forever.
SKÅDIS is IKEA’s name and design. Parts made here and by the community are compatible with it, not official IKEA parts. Everything on this page is measured from real boards; boards vary slightly, which is why every number in the Skådis Studio is a setting and it starts with a fit test.
Boards
The boards are fibreboard with a folded edge that stands them off the wall, which leaves room behind for the lips of hooks. They come in three standard sizes and can be joined side by side or stacked with connectors.
| Board | Size (W × H) | Notes |
|---|---|---|
| Narrow | 36 × 56 cm | Fits between studs and beside desks. |
| Square | 56 × 56 cm | The most common size. |
| Wide | 76 × 56 cm | Above a workbench or desk. |
Painted boards (white, black and colours) measure about 5.2 mm thick; the unpainted wood-coloured ones about 4.8 mm. That 0.4 mm difference is why a lip that clicks tight on one board can rattle on another: design for 5 mm, and let people adjust.
Want a board in a size IKEA doesn’t sell? The Skådis Studio prints pegboard panels with the same slot pattern, sized for your printer and with screw holes to mount them.
Dimensions
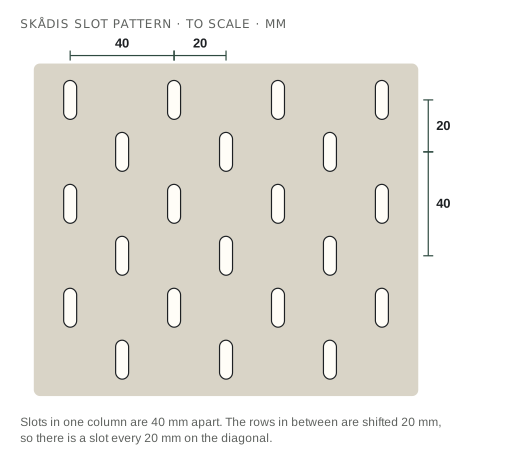
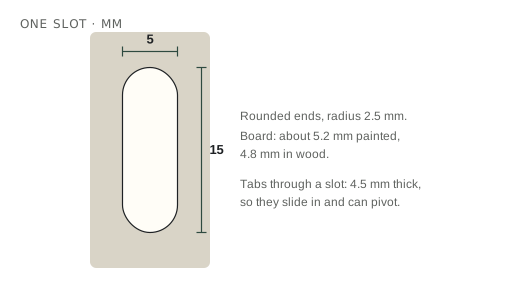
These drawings are to scale and use the same numbers as the Skådis Studio.
| Part | Measurement | Value |
|---|---|---|
| Slot | Size | 5 × 15 mm, 2.5 mm radius ends |
| Grid | Same column, next slot | 40 mm below |
| Grid | Next column | 40 mm across |
| Grid | Offset rows | 20 mm across and 20 mm down |
| Board | Thickness | ≈ 5.2 mm painted, ≈ 4.8 mm wood |
| Printed tab | Thickness through a slot | 4.5 mm (4.6 mm for a snug fit) |
| Printed tab | Height in the slot | 6 mm (leaves room to tilt it in) |
| Printed lip | Drop behind the board | 6 mm, 2.4 mm thick |
| Clearance | Around tabs and pegs | 0.3 mm a side (a setting) |
How parts hang
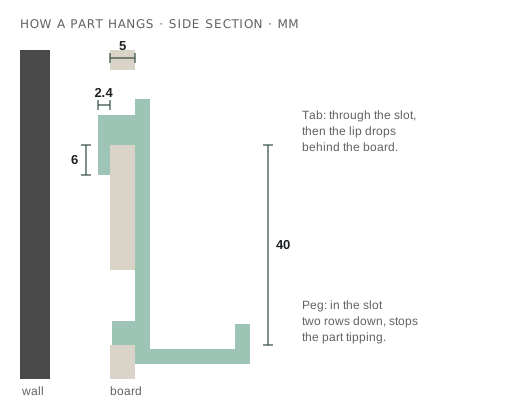
- Top tabs carry the load. One tab is fine for a light hook; anything wider than about 40 mm should have a tab in two columns, so it can’t twist.
- Lower pegs stop tipping. A short peg (no lip) in the slot 40 mm below the tab takes the push of the load back into the board. Without it, a loaded shelf rotates forward and the tab levers on the slot.
- Use the offset rows. A part that is 20 mm off-grid (the offset slots) is just as valid, which gives you 20 mm steps on the diagonal for fine positioning.
- Keep the lip short. The lip has to fit through the slot while the part is tilted, so tab height + lip drop must stay under the 15 mm slot height with some room to swing.
Designing your own parts
Most failed Skådis prints fail for the same handful of reasons. These rules are what the Skådis Studio follows; stick to them in your own CAD and parts fit first time.
- Start from the grid. Put tabs exactly on 40 mm centres (or 20 mm on the diagonal). Parts that span columns must be
(columns − 1) × 40 mmbetween tab centres, not “about 80 mm”. - Tabs 4.5 mm thick, 6 mm tall. Thicker won’t go in; thinner rattles. Offer a 4.6 mm “snug” version for painted boards.
- Round what goes through the slot. Round or chamfer the tab’s leading edge and the bottom of the lip so they slide in without catching.
- Fillet the tab where it meets the back plate. That inside corner is where a loaded hook snaps. A 1–2 mm fillet more than doubles its strength.
- A back plate of 3 mm or more sitting flat on the board spreads the load and stops the part rocking.
- Design for the print orientation (below): the tab must be printed along its length, never standing up.
- Test with a fit piece. Print one tab, a lip and a peg before a four-hour shelf. The Skådis Studio’s Fit test item does exactly that.
- Label your clearance. When you share a model, say which board it was tested on (painted or wood) and the tab thickness, so people can pick the right version.
Width calculator
How wide can a part be for a given number of columns, and where do its tabs go?
Printing
- Lay hooks on their side. A hook printed standing up has its layer lines across the tab, and it snaps at the first heavy load. On its side, the layers run along the tab. Every part the Skådis Studio makes is laid out like this for you.
- Shelves and trays print on their back plate with the tabs lying flat along the bed edge, or on their side if they are narrow.
- Walls beat infill. Four walls (perimeters) and 20–30% infill make stronger hooks than two walls and 100% infill.
- Watch the elephant’s foot on tabs printed flat: a squashed first layer makes a 4.5 mm tab 4.8 mm. Use your slicer’s elephant foot compensation, or add 0.1 mm of clearance.
- No supports needed for a well-designed part: tabs, lips and pegs are all printable on their side.
Materials and loads
| Material | Good for | Watch out for |
|---|---|---|
| PLA | Light hooks, labels, desk organisers | Creeps under constant load: a loaded hook slowly bends over months, and softens in a hot garage. |
| PETG | Most tool hooks and shelves; the safe default | Strings a little; slightly flexible, which actually helps tabs survive knocks. |
| ASA / ABS | Garages, workshops, anything in the sun or heat | Needs an enclosure to print well. |
| PA / PC / CF blends | Heavy tools, power tools, long shelves | Dry the filament; CF blends need a hardened nozzle. |
| TPU | Soft cradles and non-scratch pads added to hooks | Not for tabs: too flexible to hold the lip behind the board. |
The board is the weak point before a good printed part is: each slot is a thin bridge of fibreboard. Spread heavy things across several tabs and columns, and screw the board to studs or proper wall plugs. See the filament guide for every material in detail.
Fixing fit problems
| Problem | Likely cause | Fix |
|---|---|---|
| Tab won’t go in | Tab too thick, elephant’s foot, or printed standing up | Reduce tab thickness 0.1 mm, turn on elephant foot compensation, lay it on its side. |
| Part rattles or falls out | Wood board (thinner), or tab too thin | Use the 4.6 mm snug tab, or reduce clearance. |
| Shelf tips forward | No lower peg | Add pegs two rows (40 mm) below the tabs. |
| Hook snaps at the tab | Layer lines across the tab, or a sharp inside corner | Print on its side; add a fillet where the tab meets the plate. |
| Lip won’t swing through | Tab + lip taller than the slot allows | Shorter lip drop (5–6 mm) or a lower tab. |
| Two-column part won’t seat | Tab spacing not a multiple of 40 mm | Put tab centres exactly (columns − 1) × 40 mm apart. |
Skådis and Gridfinity
The two systems get on well. The Skådis Studio makes a Gridfinity shelf: a Skådis-mounted shelf with a Gridfinity baseplate on top, so any Gridfinity bin can live on the wall and come down to the bench. Note the grids don’t line up (42 mm and 40 mm), so the shelf is sized in Gridfinity units and hung on the nearest Skådis columns.
Glossary
- Slot
- One of the 5 × 15 mm openings in the board.
- Tab
- The part of an accessory that goes through a slot.
- Lip
- The downward hook on the end of a tab that catches behind the board.
- Peg
- A short tab with no lip, lower down, that stops a part tipping.
- Back plate
- The flat part that sits against the front of the board.
- Offset rows
- The second grid of slots, shifted 20 mm across and down.
- Fit test
- A tiny print with a tab, lip and peg to check your board before a big part.
Resources
- Skådis Studio: design hooks, shelves, tool holders, trays, Gridfinity shelves and your own pegboard panels, with a fit test, and download 3MF or STL.
- Skådis board on the forum: ask about fit, share parts, get help.
- Skådis parts on VERTEX made by the community.
- Search “Skadis” on Printables and MakerWorld for thousands of ready-made accessories; check the description for the tab thickness and which board it was tested on.
- IKEA’s SKÅDIS range for boards, connectors and the official accessories.